Showing posts with label baking. Show all posts

Monday, April 1, 2013

White Chocolate Caramel Blondies

Howdy Bloggs,

Well I am back at it! After a crazy week last week, where everyone got sick and Easter festivities, I am hoping to be back to my MWF blog posting sched. AND I get to share some delicious desserts with you today!!

White Chocolate Caramel Blondies. Yup. You know you want them. I want them. Again! This is another Pinterest recipe. Find my Pinterest boards here. This review is based of the recipe you can find here.


White Chocolate Caramel Blondies

1/2 cup melted butter
1 cup brown sugar
1 egg
1 tsp. vanilla
1/8 tsp salt
1 cup flour
1 cup white chocolate chips
1/2 cup caramel bits 

1. Preheat oven to 350

2. Grease an 8x8 OR 9x9 pan

3. Beat butter and brown sugar until smooth in a large bowl. Add the egg and vanilla and beat well

4. In a separate bowl, mix salt and flour. Add the flour mixture to the wet ingredients and mix well

5. Stir in caramel bits and 1/2 cup of the white chocolate chips. Pour it all into pan and bake for 25-30 minutes. 

6. Remove and cool, melt remaining white chocolate chips in a microwave safe bowl, stirring every 20 seconds. Drizzle over blondie bars and serve! 


Delicious caramel-ness


REVIEW:

Pretty good! It sure hit my blondie craving. They probably would have tasted even better had mine not gotten a little crispy due to a wailing baby. These bars are chewy and adding the chips AND caramel pieces make for plenty of goodness in each bite. I don't think I could eat a blondie any other way :) Best recipe I have found for blondies so far! 

Give it a try and let me know!!


    TheBetterMom.com

    Wednesday, March 20, 2013

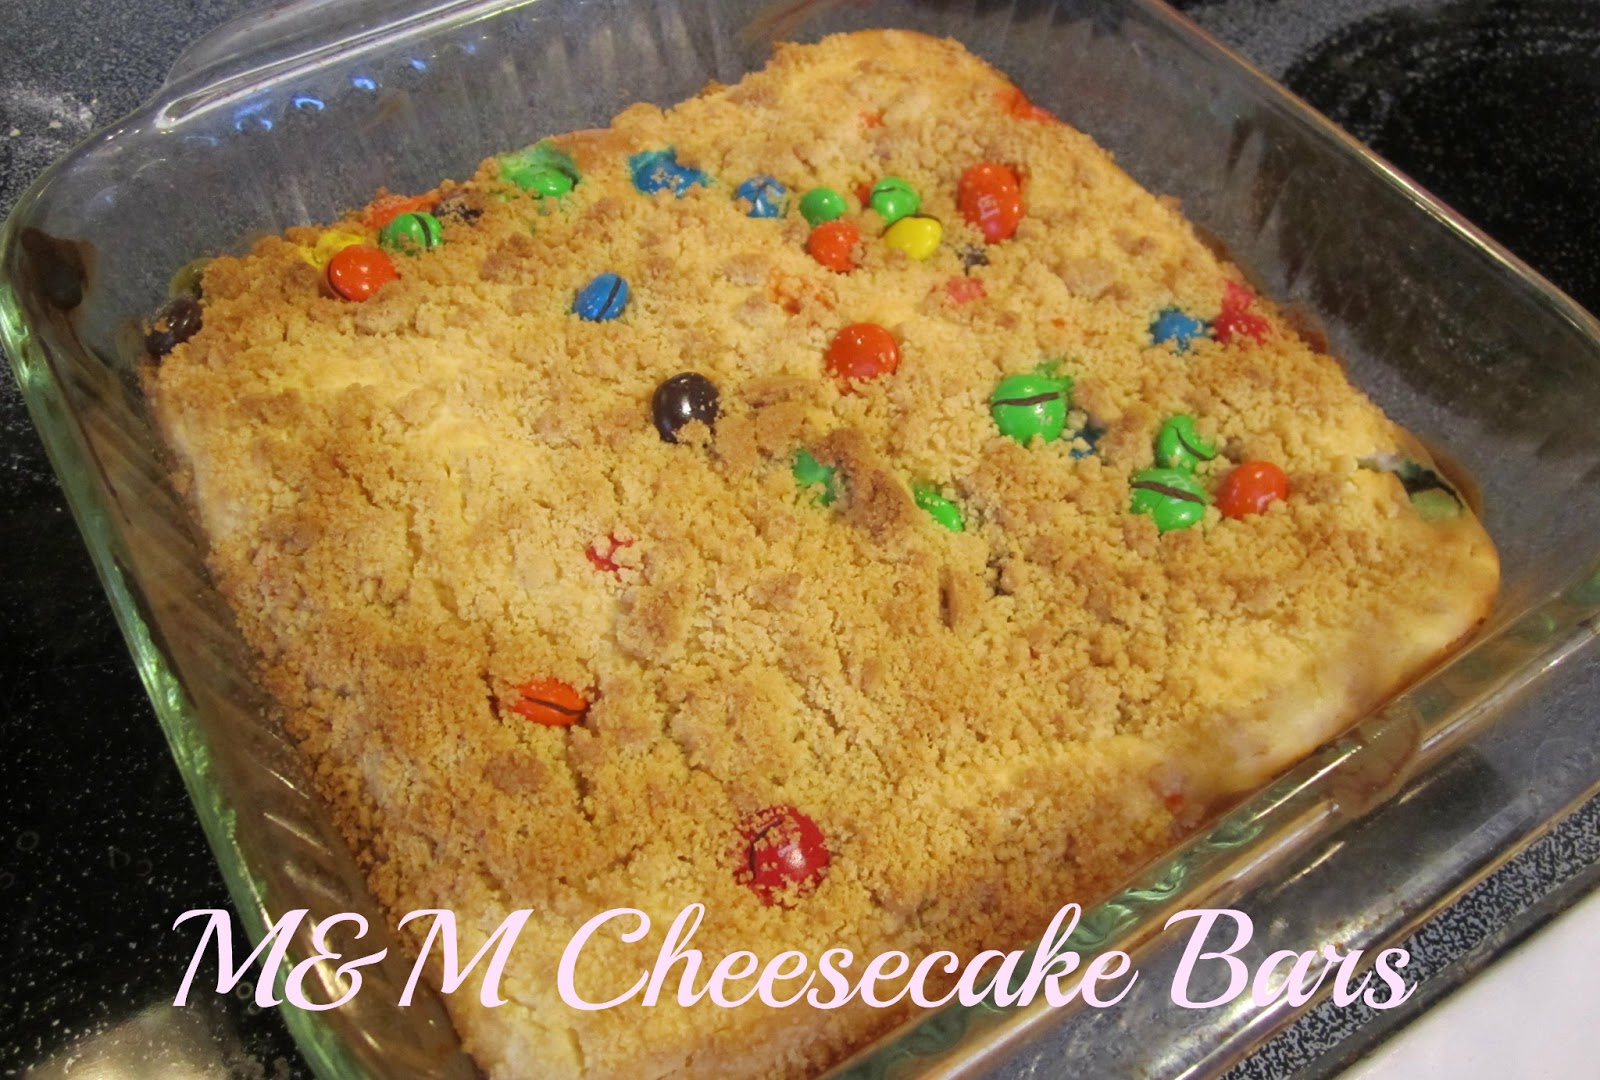
    M&M Cheesecake Squares

    Hey Hey Bloggs,

    Well, its time for another Pinterest recipe! After spending too much time on Pinterest, I realized I should make my time there more worth while by actually making and reviewing the recipes and DIYs I have pinned. You can find the first recipe I tried here and my Pinterest Baking Board here.

    This week I made M&M Cheesecake Squares!! NUM! Find original recipe here.


    M&M Cheesecake Bars

    1 8oz cream cheese package, softened
    3/4 cup M&M candies
    1 egg
    1/3 cup butter
    1 cup flour
    1/4 cup white sugar
    1/3 cup brown sugar, packed
    1 tsp vanilla
    Optional: handful of sliced almonds, or other chopped nut

    1. Preheat oven to 350 F

    2. Beat butter and brown sugar with mixer until fluffy. Add flour and almonds if using; mix well

    3. Set aside 1/2 cup of crumb mixture. Press the remaining mixture into a greased 8" or 9" square baking dish

    4. Bake at 350 for 10 minutes

    5. Combine the cream cheese, white sugar, and vanilla using mixer until well blended. Add the egg and mix well.

    6. Layer 1/2 cup of M&M candies over the baked crust, then top with the cream cheese mixture.

    7. Combine the remaining candy and reserved crumb mixture. Sprinkle over the cream cheese mixture.

    8. Bake at 350F for 20 minutes

    9. Cool completely before serving. 

    **LOOK at those nummy M&Ms!!**


    REVIEW:

    DEE-licious!! I tried one right out of the oven and thought for sure Hubby wouldn't like them. FALSE. Of course, he didn't get to try them until he came home several hours late when they had already cooled. They tasted much better when cooled. It was fairly easy to make, although it did have multiple steps. I want to share one more picture; I wasn't sure I was even going to add any nuts because I thought it would interfere with the delicious sugar-y flavor. At the last second I decided to add a handful just to keep close to the original recipe. Thus, I just added a handful of sliced almonds on the top of the base crust. It was a great idea because it added just the slight crunch the crust needed. Here is what I did:


    Lastly, I am sure this recipe could be easily customized. For example, instead of M&Ms using regular chocolate chips or taking them out all together for something more healthy, like nuts or berries. You could also add more flavor to the *pretty boring* crust by adding cinnamon and oats! MMMMMmmmm boy does that sound good! 

    Leave me a comment if you give these a go, or if you are trying any Pinterest recipes for yourself!!


    Monday, March 11, 2013

    PB Graham Cracker Balls

    Howdy Howdy Bloggy!

    As part of a new deal with myself, I have decided to commit and actually make some of the recipes and DIYs I find on Pinterest. You can find my Pinterest home here.

    For my first "Accomplished" challenge, I decided to pick an easy, quick recipe. One where I actually had all the ingredients on hand. Often times I find recipes that say "with ingredients from your cupboard", but then lists coconut oil. I didn't even know coconut oil was a thing, much less where to find it! Or even just the simple mint chocolate chips. Delicious yes, but not always something I keep on hand. For me, chocolate chips, peanut butter, and graham crackers ARE something I actually keep stocked in my cupboard!

    So get ready for a MESSY recipe! This would be a fun one to make with older kids who enjoy fun textures and getting their hands sticky. I like to provide the original recipe, but make notes in red about my recommended changes.

    I am going to include a picture from the website where I found the recipe, because *spoiler alert* mine turned out looking nothing like these :)

    Peanut Butter Balls
    http://blog.babygizmo.com/2012/06/peanut-butter-graham-cracker-balls/


    Peanut Butter Graham Cracker Balls

    1 cup peanut butter
    1 1/2 graham cracker crumbs (I used just about one whole package)
    1-1 1/4 cup chocolate (I used semi-sweet, but would definitely try dark next time!)

    1. Smash up your graham crackers to make 1 1/2 cup of crumbs (I just whacked them on the counter a bunch of times!). Add crumbs to 1 cup peanut butter. Mix it up really good. (I discovered using my hand worked better than any spoon). The mixture needs to be dry/wet enough to form balls. Add more crumbs or pb until you are able to do so efficiently (I needed to add more peanut butter than called for).

    2. Form even sized balls with your hands and place on a wax covered plate/cookie sheet. Freeze for 30-60 minutes.

    3. Melt the chocolate in the microwave, stopping every 20 seconds to stir until completely melted. 

    4. Using a toothpick or fork (fork works best. Toothpick just slides off or breaks the ball), dip the balls into the chocolate, one at a time. Refrigerate or freeze until firm. 

    **The original recipe calls for mini chips or heath bits to roll the chocolate coated balls in, I completely bypassed this step because I knew it would make a mess. Taking a chocolate covered ball and dropping it into a bowl of candies is just asking for a giant clump! You could drop some mini chips on top of the balls, or for a contrasting effect, sprinkle with powdered sugar.

    REVIEW:
    For me, the balls were completely difficult to form. Even adding extra pb, the balls were just to dry and wouldn't stick. I made about 16 or so before giving up when the recipe says it will make 24. Perhaps chunky peanut butter works better than smooth. 

    I also had to use more chocolate to melt than called for. I tried to use a smaller bowl so that it would be deep enough to dip one of the balls in and completely cover it, but that didn't work out for me, so I had to use more. Even still, I had a difficult time completely covering the balls...which is why I don't have my own pictures :)) I am sure someone with more skill and better patience will do just fine. 

    I wasn't sure what my husband would think, but he really does like them! And doesn't even care what they look like. Still, I think I would only make this recipe again if he asks for it specifically. And try it with oats. Mmmmm, oats.....

    If you decide to give these ago, let me know what you think!!

    TheBetterMom.com

    Wednesday, February 13, 2013

    Totally Chocolate Chocolate Chip Cookies

    Hello Bloggy!

    Ready for a rocking recipe?? This one was DELISH!! The Totally Chocolate Chocolate Chip Cookies uses a whole pound of chocolate chips! So it may be a good recipe to leave until the chocolate chips are on sale at the grocery store.

    I don't think I needed to make any changes or suggestions at all to this awesome recipe! Let the pictures speak for themselves! So let's just jump in!


    Ingredients:
    2 2/3 cups (16oz) semisweet chocolate chips {WOW! I wonder what this would taste like with some dark chocolate chips thrown in! hmmmm..}
    1 cup all-purpose flour
    1/4 cup unsweetened Dutch-process cocoa powder. (You can see what I used in the picture above)
    1 teaspoon baking soda
    1/2 teaspoon salt
    1/2 cup (1 stick) butter, slightly softened
    1/2 cup packed light brown sugar
    1/4 cup granulated sugar
    1 large cold egg
    1 teaspoon vanilla extract

    GO TIME!
    Preheat oven to 350 degrees F. Line 2 baking sheets with parchment paper or spray liberally with cooking spray.

    Melt 2/3 cup of the chocolate chips. You can do this in the microwave (stir every 20 seconds until fully melted), or use a double broiler. (Or use an available hubby!) Set aside.

    Sift the flour, cocoa powder, baking soda, and salt into a medium bowl and set aside. In a large bowl, using an electric mixer on medium speed, beat the butter, brown sugar, and granulated sugar until smoothly blended. On low speed, mix in the melted chocolate chips until blended. Add the egg and vanilla, mixing until just blended. Add the flour mixture, mixing until just incorporated. Mix in the remaining 2 cups chocolate chips.

    Use an ice cream scoop or 1/4 cup (that is what I did!), scoop mounds of dough onto the prepared baking sheets, spacing them about 3 inches apart. 

    Bake one sheet at a time until they crack on the top, about 18 minutes. Cool on baking sheets for 5 minutes before transferring to a wire cooling rack. 


    See how mine are cracked on the top?? Perfecto! Eat them right away or store in an air tight container. I left some on my kitchen counter under the window and they got hard, but a quick stint in the microwave warm them right up to soft and gooey again! 

    ENJOY!! 


    Tomorrow (Baby willing :D) I will post a quick and easy craft to make for Baby!! 


    Thursday, October 11, 2012

    Butterscotch Pudding Triple Chip Cookies

    Hello Bloggy World!

    I just couldn't wait to share these cookies with you!! I found them via Pinterest of course! (http://pinterest.com/alyssa_zech/ Follow me I will follow you back!!). They come from a blog called Two Peas and Their Pod. Check them out for lots of delicious looking recipes!


    Look at that deliciousness!! It uses butterscotch chips, white chips, and chocolate chips! NUM!! The butterscotch pudding I only found at Cub and not Target, so it may not be found at all grocery stores. I was also already planning on stocking up my baking cabinet for the holidays, so I had an excuse to be buying so many different kinds of chips. If buying butterscotch chips is not in your budget (believe me, they aren't a chip I bake with often enough to keep in my cupboard), substitute peanut butter chips, mini peanut butter cups cut into pieces, or just totally omit and add more white and chocolate chips!

    My husband has claimed these as his new favorite cookie and demands I make them every week. So make room in your baking schedule and try these out for sure! 

    ***
    Ingredients:

    1 cup (2 sticks) butter softened
    3/4 cup brown sugar packed
    1/4 cup white sugar
    1 (3.4 oz) package butterscotch instant pudding mix
    2 large eggs
    1 tsp vanilla extract
    2 1/2 cups all-purpose flour
    1 tsp baking soda
    1/2 tsp salt
    1 cup semisweet chocolate chips
    1 cup white chocolate chips
    1 cup butterscotch chips

    Go Time!:

    1. Preheat oven to 350 F. Line a baking sheet with parchment paper or grease and set aside. 

    2. Using a mixer, beat together butter and the sugars until creamy. Add in butterscotch pudding mix, eggs, and vanilla extract. In a medium bowl, whisk together flour, baking soda, and salt. (I fully admit that I did NOT combine the dry ingredients together, but rather just added them one at a time to the pudding mixture. Cookies still turned out awesome and fluffy!)
    Add the dry ingredients to the pudding mixture and mix until just combined. Stir in the chips.

    3. Drop cookie dough by rounded tablespoons onto baking sheet. Bake for 10 minutes, or until slightly golden around the edges. Remove cookies from oven and let cool on baking sheet for two minutes before transferring to a cooling rack. 
    ***


    I hope you enjoy this recipe! I am already planning on making them again just for Hubby later this week or early next week again. 

    Stay tuned for Peanut Butter Oatmeal Cookies!! 


    Thrive @ Home Link-Up


    Wednesday, October 3, 2012

    Caramel-Apple Cookies

    Whoa!!!

    Are you shocked Bloggy?? This will be my THIRD post in one week!! Amazing, I know. But I simply could not pass up the opportunity to share this amazing cookie recipe with you any longer. I first found it in Parents Magazine.


    C aramel-Apple Cookies

    Sorry I didn't take any pictures of my own, I couldn't stop eating to pick up my camera. Normally I am not a baked apple kinda gal. I like my apples COLD and CRISP not warm and mushy like in apple pies. Blech. So even I was surprised that I wanted to give this recipe a shot. And I am so glad I did. The apple pieces did not turn mushy or brown for me, and when they were still fresh from the oven I swear I hardly noticed them at all! 

    The recipe itself does not call for a certain kind of apple, and as I fully admit I am an apple baking noob, I just randomly picked one at Target. I used a Gala apple. It worked perfectly for me and now its probably the only apple I would use. I might try a Granny Smith next time around as I feel that is the official "Fall Apple". 

    My last note: I also did not make my own caramel drizzle. I was not sure I would be able to find vanilla caramels and so I didn't even try :) I just used caramel drizzle from a bottle (the kind usually used for ice cream).

    Without further ado::
    ****

    Ingredients
    2 sticks salted butter, softened
    1 cup white sugar
    1/2 cup packed brown sugar
    2 eggs
    2 tsp. vanilla extract
    2 2/3 cups all-purpose flour
    1 cup graham-cracker crumbs
    2 tsp. baking powder
    1/2 tsp salt
    1/2 tsp cinnamon
    1 small apple, peeled, cored, and finely chopped (3/4 cup)

    1 cup vanilla caramels
    3 Tbs whipping cream

    Go Time!:
    1 Preheat the oven to 350 F. Line cookie sheets with parchment paper or grease. In a bowl, beat butter on medium to high speed for 30 seconds. Beat in sugars until fluffy. Then add eggs and vanilla. Beat.

    2. In a medium bowl, stir together flour, crumbs, baking powder, salt, and cinnamon. Add to butter mixture and beat until combined. Stir in apple.

    3. Shape dough into 1 1/4-inch balls. Arrange balls 2 inches apart on cookie sheets. Bake for 12 minutes or until edges are lightly browned. Removed and let cool on wire racks

    4. In a bowl, mix caramels and cream. Microwave on high for 30 to 60 seconds or until nearly melted, stirring once. Stir until smooth. Drizzle over cookies; serve when hardened. 
    ****


    Me again. I preferred these cookies warm. And the batter was delicious! Just saying. 

    I don't know about you guys, but I am not a professional baker. I usually ignore things like 'shape dough into 1 1/4 inch balls'. I just plop them on the sheets and hope for the best. It has yet to fail me. 

    I also find some recipe directions ridiculous. Do you??? Is it just me?? Step Four: "...stirring once. Stir until smooth". Why is there a specific direction to only stir once if you have to stir until smooth anyways??? 

    Oops. Now you definitely know I am not a professional!! 


    Tried a link up at Homemaker By Choice!

    Saturday, August 4, 2012

    Cookie-Ception

    Hello Bloggy.

    Sorry I missed TWO Top 10 Fridays!! I was on vacation with the fam. And it was wonderful! I wish it never ended!!

    Here is a baking Pinterest project I tried a while back. I call it Cookie-Ception as it is a cookie within a cookie. It is NOT complicated by any means and is SUPER easy to construct (and then eat!). Follow along closely so you don't get confused:

    Step One: Buy some pre-made cookie dough and a package of Oreos (double stuff is great!)

    Step Two: Pre-heat the oven according to the directions on the package of cookie dough

    Step Three: Spoon about a 1/2 inch to 1 inch cookie dough onto a greased cookie sheet. Form into a patty

    Step Four: Place Oreo on top of cookie patty. 


    Step Five: Form another cookie patty on top of the Oreo

    Step Six: Try to pinch the cookie patties together around the edges of the Oreo

    Step Seven: Bake the cookies according to the package of cookie dough.

    Make sure to cool completely before eating!


    Voila! Cookie-Ception!! Tasty and easy and quick! Hard to beat! 

    Check out this Pin on my Baking Board, and all my other boards on Pinterest!!

    Sunday, February 19, 2012

    Red Velvet Cheesecake Brownies


    Red Velvet Cheesecake Brownies


    Yield: 16 hearts

    ingredients:

    Red Velvet Layer:
    3 1/4 cups flour
    2 1/4 cups granulated sugar
    3 tablespoons cocoa powder
    1 teaspoon salt
    1/2 teaspoon baking powder
    3 large eggs
    1 cup vegetable oil
    4 tablespoons milk, divided
    1 tablespoon vanilla extract
    1 tablespoon red food coloring
    2 teaspoons white vinegar
    Cheesecake Layer:
    2 8oz packages cream cheese, softened
    3/4 cup granulated sugar
    2 large eggs
    2 teaspoons vanilla

    directions:

    Preheat oven to 350 degrees. Grease a 13 x 18 jelly roll pan with butter or spray with Baker's Joy.
    In large bowl, whisk together flour, sugar, cocoa powder, salt, and baking powder. Set aside. In a medium bowl, whisk together eggs, vegetable oil, 2 tablespoons milk, vanilla extract, red food coloring, and white vinegar.
    Combine the dry and wet ingredients, until completely combined. The batter will be a really thick, almost moldable texture...but don't worry, that's what you want. Remove 3/4 cup of the batter and place it in a medium bowl. Whisk in the remaining 2 tablespoons of milk (into the 3/4 cup of batter you just took out). Set aside the 3/4 cup batter.
    Pour the remaining batter into the prepared jelly roll pan. Using a spatula, smooth out the batter to reach all the edges.
    Now, in your stand mixer, beat cream cheese and sugar until fluffy, about 2 minutes. Add eggs and vanilla, beating until combined and there are no lumps. Pour the cream cheese mixture on top of the red velvet layer and smooth mixture till it reaches all the edges.
    Drop spoonfuls of the remaining red velvet batter (that you mixed with milk) onto the top of the cheesecake layer. Drag the tip of a knife through the red velvet and the cheesecake layers to create swirls.
    Bake for 30 minutes, rotating half way through, or just until the center is set and it no longer jiggles. Let cool completely on a wire rack before cutting. Use a medium sized heart cookie cutter to create the perfect Valentine's Day treat!

    These were absolutely amazing!! Hubby compared them to cosmic brownies in how rich and think they were. I used a smaller pan than she did so my brownies were much more thick. Thus, they took FOREVER too cool. I ended up sticking them out on the deck for 1/2 hour. 
    I do say these are a MUST MAKE!! I will be making them again for sure!! But...probably skip using the cookie cutter. I hate cookie cutters. I would rather just stand over the pan and eat away :0D. 
    Well, I would also update on my life but..."Meaningless! Meaningless! Everything is Meaningless!"--Bible. 
    Off to a Vampire Diaries marathon!

    Friday, September 9, 2011

    Baking Day!

    Hello! 

    Today is a BAKING DAY!! YAY!
    I have officially decided to go with : CHOCOLATE CHIP STUFFED COOKIES! 
    This is the first time I will be attempting this recipe, but I figured it would be fun to document the process and see how they turn out..45minutes later..it turns out to be mixed success! My cookies really grew so that they were no longer stuffed cookies :( But! They are still delicious! And who doesn't love giant cookies??

    The Goods:
    2 cups flour
    3/4 teaspoons baking soda
    1/2 teaspoon salt
    1 cup (2 sticks) unsalted butter, slightly softened
    1 1/2 cups packed brown sugar
    2 large cold eggs
    2 teaspoons vanilla extract
    3 cups semisweet chocolate chips

    Preheat oven to 350 degrees F. Line two baking sheets with parchment paper. {This was my first time actually using my parchment paper, and I am not so sure I liked it. It just slid all over the tray, if anyone has any hints to make the paper stay in place while placing cooking dough, let me know!!}

    Sift the flour, baking soda and salt in a medium bowl and set aside.
    In a larger bowl, using an electric mixer, beat the butter and brown sugar until smooth.
    NUM!! Can't go wrong here!!


     Add the eggs and vanilla and mix until blended. On low speed, add the flour mixture just until incorporated.
    This is probably where I went wrong, I added the flour in small doses
    This caused the dough to be much softer than it was supposed to be

    Add in 2 cups of chocolate chips. {DON'T FORGET! Like I almost did! :))}

    Rolls 2 tablespoons of dough into a ball and flatten slightly to make a disk and place on prepared baking sheet. Repeat to make a total of 16 disks. Space the dough disks about four inches apart {they do grow!}. Lightly press 1 tablespoon of remaining chocolate chips onto each disk. Using remaining dough, make 16 more disks, place one on top of each chocolate-chip-topped disk. Press gently to cover around the edges. 
    You can tell my dough was too soft. And I made mine bigger. 
    {The bigger the better!}
    You can also see where I was struggling with the parchment paper. boo. 

    Bake one sheet at a time until edges are lightly browned but centers are still golden, about 15 minutes.
    Cool on baking sheets than transfer to wire rack. Serve warm or room temperature! 

    First batch! Since my dough was not as stiff, they flattened out :(
    Taste factor=still amazing!! 


    Monday, August 22, 2011

    Welcome!

    Hello Friends!

    I am hoping this will be a place where I can share my baking recipes (and get some feedback!), my Christian walk, and my (failing) efforts to become more organized in home and body.

    So here is the first recipe!!

    Mini Chip Cheesecake Bars

    • 1 Can crescent dinner rolls (I use Pillsbury! Num!) 
    • 2 packages cream cheese, softened 
    • 1 egg 
    • 3 tablespoons sugar
    •  1/2 cup mini semisweet chocolate chips
    1.  Unroll dough in two long rectangles and press one rectangle in bottom of greased 8-inch square baking dish. Press along the perforations to seal.  
    2. In a small bowl, beat the cream cheese and sugar til smooth. Add the egg; beat just until mixed. Fold in mini chocolate chips; spread over crust 
    3. Top with remaining rectangle of dough pressing out to the edges of dish
    4.  Bake at 375 degrees F for 18-22 minutes or until golden brown. Cool for an hour on a cooling rack. Cut into 3 rows by 3 rows to make 9 bars. Cut diagonally for smaller triangles. Store covered in refrigerator. 
    Let me know if you try it and what creative spins you come up with. I have tried using dark chocolate chips instead of semisweet; that sure hits my sweet tooth!!